Quantcast
Viewing all 1674 articles
Browse latest View live

Decoding Es’Hail-2 DVB-S2 Realtime in Linux with LeanDVB

Last week we posted about M Khanfar's YouTube video that showed how to decode Es'Hail-2/QO-100 DVB-S2 on Ubuntu with the LeanDVB decoder. However, the method he showed was not in real time as it involved recording an IQ file in GQRX first, then decoding that IQ file. Similarly we also posted last week about a Windows based real time decoder.

M Khanfar recently wrote in again and wanted to show that real time decoding is possible with LeanDVB. The method is to simply pipe the output of the rtl_sdr command line decoder in LeanDVB, and then into VLC. He notes that his PC isn't actually fast enough to decode in real time without lag, but a modern i5 CPU would work well. The actual terminal command is shown in his YouTube video description.

This is Realtime live DVB-S2 Decoding done , without need to record .RAW file , its live and easy method by one click ! In this video i decoding 2MS symbol rate from wideband transponder of QO-100 beacon , you can decoding 1MS , 0.5MS , 333KS , 125KS symbol rate ! The lower Symbol, the faster speed for decoding! , the Amateurs operators on QO-100 Uplink DATV DVB-S2 at 0.5 , 333 , 125Ks , so its easy to Live Decoding Now ! With very low SNR ! , so the normal SDR can coverage wideband beacon of 2Ms symbol and all Ham uplink ! , if you have an SDR that can coverage 27.5 mb of bandwidth, so you can easy decoding Live a standard commercial satellite channels! But it need a high speed Pc .
QO-100 Realtime Live DVB-S2 Decoding

Vela Pulsar Glitch Detected with RTL-SDR Based Radio Telescope

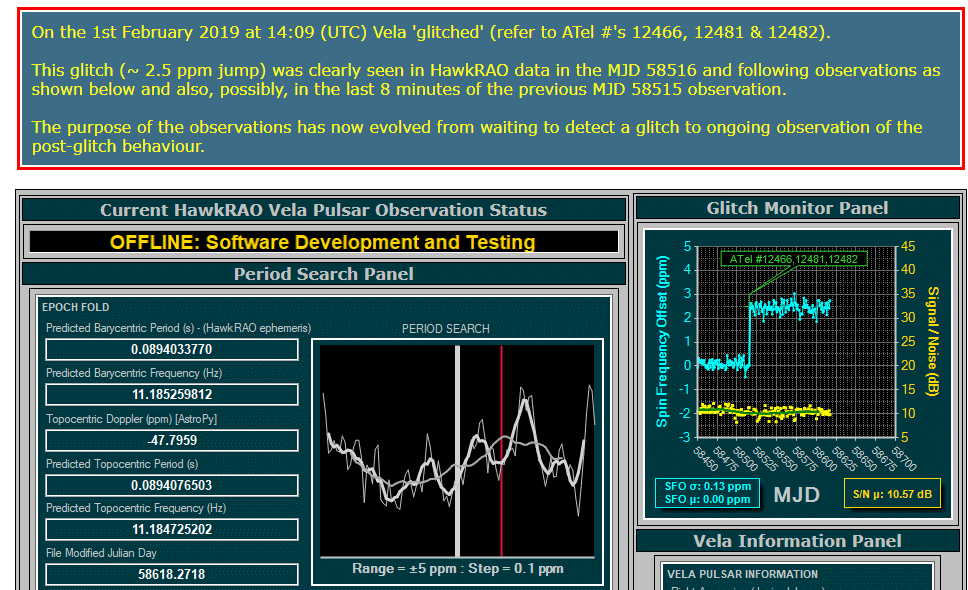
On February 1st 2019 the HawkRAO amateur radio telescope detected a "glitch" during it's observations of the Vela Pulsar. A pulsar is a rotating neutron star that emits a beam of electromagnetic radiation. If this beam points towards the earth, it can then be observed with a large dish or directional antenna and a radio, like the RTL-SDR. The Vela pulsar is the strongest one in our sky, making it one of the easiest for amateur radio astronomers to receive.

Pulsars are known to have very accurate rotational periods which can be measured by the radio pulse period. However, every now and then some pulsars can "glitch", resulting in the rotational period suddenly increasing. Glitches can't be predicted, but Vela is one of the most commonly observed glitching pulsars.

The HawkRAO amateur radio telescope run by Steve Olney is based in NSW, Australia and consists of a 2 x 2 array of 42-element cross Yagi antennas. The antennas feed into three LNAs and then an RTL-SDR radio receiver. He has been observing the Vela pulsar for 20 months.

His observations indicate that Vela glitched and spun up by 2.5PPM at 14:09 UTC on Feb 1, 2019. He claims that this glitch detection is a first for amateur radio astronomy as far as he is aware.

If you're interested in Pulsar detection, check out a few of our previous posts on the topic.

Image may be NSFW.
Clik here to view.
The HawkRAO Amateur Radio Telescope Vela Glitch Detection
The HawkRAO Amateur Radio Telescope Vela Glitch Detection (Blue graph on the right indicates the glitch detection)

Osmocom Now Releasing Weekly Windows Binaries for RTL-SDR and Osmo-FL2K

Osmocom is the open source team behind the RTL-SDR driver project and the Osmo-FL2K discovery. In a recent announcement they have noted that they are now publishing weekly binary builds for the RTL-SDR and Osmo-FL2K projects. This means that Windows users are now able to test the latest driver updates without having to compile them manually. Laforge writes:

While Osmocom in general is a very much Linux-centric development community, we are now finally publishing automatic weekly Windows binary builds for the most widely used Osmocom SDR related projects: rtl-sdr and osmo-fl2k.

You can find the binaries at The actual builds are done by roox who is building them using MinGW on OBS, see

The status of the osmocom binary publish job, executed once per week from now on, can be found at https://jenkins.osmocom.org/jenkins/view/All%20no%20Gerrit/job/Osmocom-OBS_MinGW_weekly_publish/

As a reminder, if you've ever enjoyed the RTL-SDR or Osmo-FL2k projects, you can thank Osmocom for bringing them to us for free by donating to them at Open Collective. The drivers are the root of all that we can do with RTL-SDR and FL2K, so it is only fair to thank them.

Image may be NSFW.
Clik here to view.

SignalsEverywhere: P25 Trunking with Just One RTL-SDR and DSDPlus Fastlane

Over on YouTube Corrosive from the SignalsEverywhere channel has uploaded a new video showing us how to set up P25 trunking and decoding with DSDPlus Fastlane and only a single RTL-SDR.

Normally two dongles are required to follow a P25 trunking system. One dongle continuously receives the trunking channel, and a second tunes to the voice channel chosen by the trunking channel. However, the latest DSDPlus Fastlane has a feature that allows one only dongle to be used. It works by tuning back and forth between the control and voice channel. The disadvantage is that trunking information could be missed while tuned to a voice channel, so some calls could be missed.

RTL SDR Setup P25 Trunking With 1 SDR and DSDPlus FastLane

A More In-depth Look at the Tunisian RTL-SDR Espionage Story

The Africa Report, an online newspaper specializing in African stories recently ran a story titled "A Tunisian spy story". The story discusses the circumstances behind the mysterious arrest of a UN expert in Tunisian, supposedly for having used an RTL-SDR dongle as part of his research into violations of the UN arms embargo on Libya. See our previous post for the original details.

The Africa Report story gives a more in depth look at what happened during his arrest and what is happening in Tunisia. If you're interested in following this story, this is a good read.

An RTL-SDR aircraft tracker, which can be purchased legally on the internet, is composed of an antenna and a USB key. There are smartphone apps that have similar functionalities that allow you to track commercial flight routes. Can it be that this object, found in his home, is the sole piece of evidence used by the Tunisian courts to justify the detention of United Nations (UN) expert Moncef Kartas for espionage, as his defence claims?

Kartas, who is German-Tunisian, was officially mandated in 2016 by the UN to lead an investigation into violations of the arms embargo on Libya. His carefully selected team was appointed by the UN secretary general and were due to draft a report in June. Kartas’s arrest disrupted those plans.

Kartas was arrested as he walked off a plane on 11 April in a theatrical scene at Tunis airport involving around 10 security agents. He is now awaiting trial in his cell in Mornaguia prison. Accused of “treason” and “spying for a foreign power”, he faces the death penalty. Fortunately for him, Tunisia has banned that punishment.

Rumours are running high around the activities of a security company he co-founded and the role of a second man who was also arrested. But several pieces are missing from the puzzle. The versions of the Tunisian authorities and the UN are completely different, as is the information supplied by the defence and that supplied by the prosecution. Saying it is “very concerned”, the UN is calling for the researcher’s release, pointing out that the lifting of his immunity is illegal.

[Read More]

Image may be NSFW.
Clik here to view.

QIRX SDR Now Shows Received DAB Transmitters on A Map

QIRX SDR is an RTL-SDR compatible program that focuses on DAB+ decoding and listening. In a recent update programmer Clem notes that the newest feature is a map powered by OpenStreetMap that can display a the location of received DAB stations. He writes

The main new feature is the integration of Openstreetmap to display the locations of DAB transmitters (please see attached picture of a raw recording from England), together with the own position of the receiver.

In case the transmitter ident code (TII) is detected and the transmitter is contained in the database, it is displayed on the map as an icon, colored according to the TII signal strength.

The "Own Position" is indicated as a red or green dot, either (without GNSS sensor) placed by dragging the red circle with the mouse to its correct position, or by attaching a GNSS (GPS or GLONASS) sensor.

When recording raw I/Q data, the GNSS positions are written into a second file, parallel with the .raw file. On replaying, the current recorded geolocation is displayed synchronously to the recorded transmitters on the map. This might be useful in a mobile environment. The distances are displayed in the TII table.

The transmitter database comes from two sources:

  • UK: Public OFCOM database,
  • Rest of Europe: DABLIST (www.fmlist.org), as provided by the UKW/TV Arbeitskreis e.V. (www.ukwtv.de).

Currently, both databases are merged into a single, local Excel file, serving as the data source to the software.

Image may be NSFW.
Clik here to view.
QIRX SDR Screenshot with OpenStreetMap and Received DAB Transmitter Locations Showing

NOAA-APT Software Decoder: Users Guide Now Available

Back in August, 2018 we posted about NOAA-APT, which back then was a new NOAA APT image decoder program. Recently Martin, the author of NOAA-APT has written in and wanted to note that he's now created a guide and video tutorials for his software, and for NOAA APT reception in general.

NOAA weather satellites broadcast an Automatic Picture Transmission (APT) signal, which contains a live weather image of your area. With an RTL-SDR and antenna they can be received and downloaded every time one of the satellite's passes overhead which could be multiple times a day.

Our standard NOAA weather satellite tutorial makes use of SDR#, audio piping and the WXtoIMG to receive NOAA satellite images. Martin's guide and software might be slightly easier for newbies as it only involves recording an audio WAV file, then loading it up into his software. The disadvantage is that the image is not colorized, and not displayed in real time as it is in WXtoIMG.

As you may already know, the old standard software in NOAA image decoding, WXtoIMG, is now considered abandonware, and the only place to get it is from a third party mirror rehosting the now defunct WXtoIMG website. As WXtoIMG is closed source no further development can occur on it. Martin's NOAA-APT still misses a lot of the advanced features of WXtoIMG but it is fully open source and multiplatform, and so it is a very promising program.

Receiving NOAA satellite images with noaa-apt and SDR#

Using an RTL-SDR to Monitor A Tire Pressure Sensor used in Home Brewing

Over on YouTube Andreas Spiess has been helping his friend create a pressure monitoring system for his home brew beer bottles. In order to do this, Andreas uses an externally mounted after market wireless tire pressure sensor whose data can be received with an RTL-SDR and the rtl_433 decoder software. Modern vehicle tires contain a TPMS (tire pressure monitoring system) sensor, which keeps track of tire pressure, temperature and acceleration. The data is wirelessly transmitted via 433 or 315 MHz to the cars dashboard and computer for safety monitoring.

In the first video Andreas discusses tire pressure monitors and how they could be used for other non-tire applications, talks a bit about the wireless protocol used, and how to reverse engineer it. He notes that the author of rtl_433 was able to implement his particular tire pressure sensor brand's protocol into the rtl_433 database, so now anyone can decode them. Finally in this video he also shows that he can easily spoof a flat tire signal using a HackRF and GNU Radio which might cause a modern high end car to refuse to move.

The second video shows how to continuously monitor that TPMS data for the home brew set up. Andreas uses an RTL-SDR and Raspberry Pi running rtl_433, which outputs it's data into Mosquitto, Node-Red, InfluxDB and the Grafana. These programs help to read, manage, log and graph the data. The rtl_433 program is also monitored by Supervisord which automatically restarts rtl_433 if the program crashes.

If you are interested, there is a related video that was uploaded in between the two shown below which shows how he created a 3D printed cap to mount the valve and tire pressure sensor on the beer bottles.

#261 Measure Pressure Remotely (including TPMS Hacking / Attack) for Beer Brewing

Safely Monitor and Alarm with Supervisord and Telegram

Tracking Tagged Orangutans in the Bornean Jungle with Drones, GNU Radio and an Airspy Mini

Due to various human activities causing the environmental destruction of it's habitat, the Orangutan is now classed as a critically endangered species. In addition to being endangered, Orangutans face another problem in that they are often captured and sold as pets due to their intelligence and cuteness.

To combat these problems, NGOs, charities and rescue centers have been using RF tags on rehabilitated Orangutans that have released back into the wild. The RF tag regularly transmits a data-less pulse at VHF frequencies which is then typically tracked using direction finding equipment such as a directional Yagi antenna. The range is only approximately 200-400m. 

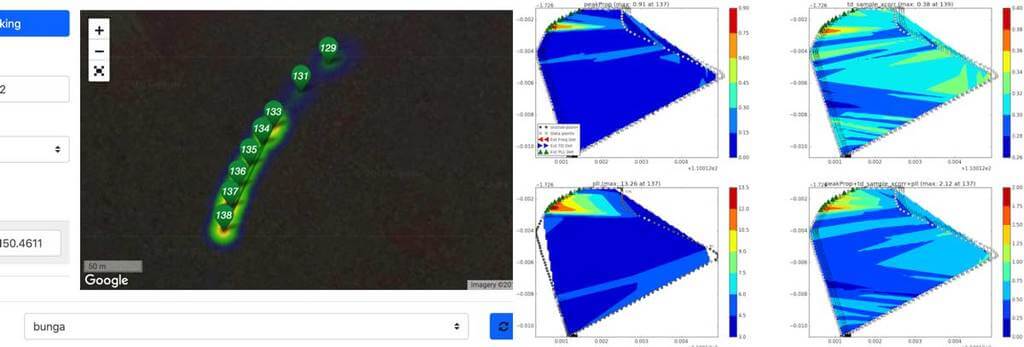
In order to try and alleviate the range issue Dirk Gorissen has been working on creating a drone based system that could detect the VHF transmission and create a heatmap of Orangutan positions. The first iteration of his system uses an RTL-SDR, Odroid and lightweight loop antenna. A simple Python script then monitors the spectrum and logs the drones current location, altitude, speed and heading when a pulse is detected. Tests confirmed that the signal was able to be detected from the sky, but unfortunately the drone was eventually crashed and lost before it could be properly used.

In his second try a few years later, Dirk used a larger drone and switched SDRs to an Airspy Mini with preamp. The pulse detection code was also improved by using GNU Radio to create a DSP algorithm combining peak detection, cross correlation with a known template of the signal, and a phase locked loop. Visualization and data transfer is achieved through react.js and a Flask web server running on the drones WiFi hotspot. This time with the new drone and system Dirk was able to successfully detect and locate several Orangutan's on various flights, despite noting that some RF tags appeared to be glitchy.

Image may be NSFW.
Clik here to view.
Orangutan Detected with Drone, Airspy Mini and GNU Radio.
Image may be NSFW.
Clik here to view.
Drone used in the experiment

SignalsEverywhere: What SDR To Buy? Choose the Right one For You

Over on his YouTube channel SignalsEverywhere, Corrosive has just released a new video titled "Software Defined Radio Introduction | What SDR To Buy? | Choose the Right one For You". The video is an introduction to low cost software defined radios and could be useful if you're wondering which SDR you should purchase.

The video includes a brief overview of the Airspy, KerberosSDR, PlutoSDR, LimeSDR Mini, HackRF, SDRplay RSPduo and various RTL-SDR dongles. In addition to the hardware itself Corrosive also discusses the compatible software available for each SDR.

Software Defined Radio Introduction | What SDR To Buy? | Choose the Right one For You

The RadioInstigator: A $150 Signals Intelligence Platform Consisting of a Raspberry Pi, RPiTX, 2.4 GHz Crazyradio and an RTL-SDR

Circle City Con is a yearly conference that focuses on information security talks. At this years conference Josh Conway presented an interesting talk titled "SigInt for the Masses Building and Using a Signals Intelligence Platform for Less than $150". Josh's talk introduces his "RadioInstigator" hardware which is a combination of a Raspberry Pi, CrazyRadio and an RTL-SDR all packaged into a 3D printed enclosure with LCD screen. The idea behind the RadioInstigator is to create a portable and low cost Signals Intelligence (SIGINT) device that can be used to investigate and manipulate the security of radio signals.

The RadioInstigator makes use of the RPiTX software which allows a Raspberry Pi to transmit an arbitrary radio signal from 5 kHz up to 1500 MHz without the use of any additional transmitting hardware - just connect an antenna directly to a GPIO pin. Connected to the Pi is a CrazyRadio, which is a nRF24LU1+ based radio that can be used to receive and transmit 2.4 GHz. And of course there is an RTL-SDR for receiving every other signal. Josh has made the plans for the RadioInstigator fully open source over on GitLab.

In his talk Josh introduces the RadioInstigator, then goes on to discuss other SDR hardware, antenna concepts and software installed on the RadioInstrigator like RPiTX, GNU Radio, Universal Radio Hacker, Salamandra, TempestSDR and more.

[First seen on Hackaday]

Track 3 07 SigInt for the Masses Building and Using a Signals Intelligence Platform for Less than 15

Decoding FT8 with an RTL-SDR Blog V3 in Direct Sampling Mode

Over on YouTube user ModernHam has uploaded a useful tutorial showing how to use our RTL-SDR Blog V3 dongles for FT8 monitoring. The RTL-SDR Blog V3 has a built in direct sampling circuit which allows for reception of HF signals without the need for any upconverter. FT8 is an amateur radio weak signal digital communications mode which can be received all around the world even with low transmit power.

In his setup he uses SDR# and Virtual Audio Cable to pipe audio to the WSJT-X decoder. His video goes through all the steps and settings that need to be set and then shows a demo of some signals being received. ModernHam also has another video uploaded a few days earlier which is a more general introduction to FT8 decoding.

If you're interested we uploaded a tutorial last year that shows how to set up a Raspberry Pi 3 based FT8 decoding station with a V3 dongle.

Decoding FT8 with a RTL-SDR (Software defined Radio)

An RTL-SDR and Pi 3 Based Ground Station for Simulated CubeSats

CubeSats are small and light satellites that can these days be built and launched into orbit by almost anyone with a small budget of roughly $40,000. They are a great way for schools and other organizations to get into a space based technology project. A "simulated" CubeSat is one that is not designed to be really launched into space, and is made from low cost hardware. The idea is that simulated CubeSats can be used as tools to help demystify the inner workings of satellites to the public and help CubeSat builders get experience and competence before building the real thing.

Image may be NSFW.
Clik here to view.
A Simulated CubeSat made from a Solar Panel board, Pi Zero, UPS and Tranceiver.
A Simulated CubeSat made from a Solar Panel board, Pi Zero, UPS and Transceiver.

A team from AMSAT have been working on creating open source CubeSat simulator hardware and software. In order to demonstrate the RF capabilities of the simulator a ground station simulator is also required. Recently the team have uploaded instructions on creating a Raspberry Pi and RTL-SDR based ground station.

If you're interested in the CubeSat simulator hardware itself, there was a presentation held back in 2018 that may be of interest to you. According to the presentation somewhere between 30% - 50% of CubeSats fail as soon as they're deployed, so building competence with simulated hardware is a good goal.

2018 AMSAT William A. Tynan W3XO Memorial Space Symposium - Saturday Sessions

SignalsEverywhere: Common Modulations Tutorial Video

This week on the SignalsEverywhere YouTube channel, host Corrosive gives us a tutorial on common modulations that you'll see on your software defined radio. His tutorial covers Amplitude Modulation (AM), Frequency Modulation (FM), Single Side Band (SSB) and Conintuous Wave (CW) modulations. In the video he shows what they look like and how to select the correct mode and bandwidth settings in SDR#. Corrosive uses an Airspy in the video, but the same concepts are valid for any SDR, like the RTL-SDR.

If you're new to SDR then this is a great introductory video to watch and learn from.

AM FM SSB and CW | Common Modulation You'll See on SDR

Tracking and Recovering A NWS Weather Balloon & Radiosonde with an RTL-SDR

Over on YouTube OLHZN High Altitude Balloons has posted a very entertaining video showing how to use an RTL-SDR and small grid dish antenna to track and recover a fallen weather balloon and its radiosonde. OLHZN writes:

The US National Weather Service (#NWS) launches over 200 weather balloons everyday carrying an LMS-6 #radiosonde / rawinsonde made by Lockheed Martin to an altitude of over 100,000 ft. and you can track & follow the flights from home and even find the landing site and pick them up! This is a fun #DIY project that you can do yourself from home and I'll show you how to do it here along with some tips so you can go find yourself a weather balloon & radiosonde!

How to track & recover a NWS weather balloon & radiosonde 🎈🎈 DIY

ExtIO_RTLSDR# – Modified ExtIO for SDRUno/HDSDR with Direct Sampling Mode

Image may be NSFW.
Clik here to view.
Fixed RTL-SDR EXTIO for SDRUno.

Over on our forums user qrp has released a modified ExtIO that allows the direct sampling mode to work correctly in SDRUno. SDRUno is SDRplay's official software for their RSP line of software defined radios, but SDRUno can also work with ExtIO input dlls which allow other SDRs like the RTL-SDR to be used.

The commonly found RTL-SDR ExtIO however doesn't seem to work properly with direct sampling mode in SDRUno, so HF on RTL-SDR Blog V3 or other direct sampling modified RTL-SDR dongles is inaccessible. The new ExtIO fixes the direct sampling problem, and also enables a Remove DC algorithm to remove that center spike, which isn't an option in SDRUno.

To use the ExtIO simply extract the ExtIO_RTLSDR_u8.dll and rtlsdr.dll files from the zip file into a folder on your PC. Then from the Start Menu find the SDRUno (EXTIO) shortcut and run it. When it asks you, select the ExtIO_RTLSDR_u8.dll file. Note that you will probably need to use the older v1.22 SDRUno version as V1.31 doesn't appear to have an ExtIO version.

Reverse Engineering and Controlling a Wireless Doorbell with an RTL-SDR and Arduino

Thank you to Shreyas Ubale for submitting his blog post about reverse engineering a wireless doorbell, and then performing a replay attack. Shreyas had purchased a wireless doorbell set containing one button transmitter and two bell receivers. However, his situation required two transmitters, one for visitors at the door, and one to be used by family within his house.

In order to create a second transmitter he decided to reverse engineer the doorbells wireless signal, and use that information to create an Arduino based transmitter. His process involves first using an RTL-SDR to determine the transmission frequency, then using the rtl_433 software to capture the raw waveform which he then analyzes manually using Audacity. Once the binary string, length and pulse width is known he is able to program an Arduino connected to a 433 MHz transmitter to replicate the signal.

In future posts Shreyas hopes to explore other ways to transmit the signal, and eventually design a simple but configurable 433 MHz push button that supports RF, WiFi, and can support the IFTTT web service.

If you're interested, check out some of our previous posts that highlight many other successful reverse engineering experiments with RF devices and SDR.

Image may be NSFW.
Clik here to view.
Doorbell Signal Analysis in Audacity. Captured with an RTL-SDR.

SignalsEverywhere: Decoding Inmarsat EGC and AERO ACARS

On his latest video Corrosive from the SignalsEverywhere YouTube channel discusses Inmarsat LES EGC and AERO ACARS decoding. Inmarsat is a satellite provider that has multiple geosynchronous satellites that can be received from almost anywhere in the world at around 1.5 GHz with an RTL-SDR and appropriate antenna + LNA. Inmarsat EGC and AERO are two channels on Inmarsat satellites that can easily be decoded.

The Enhanced Group Call (EGC) messages typically contain text information such as search and rescue (SAR) and coast guard messages as well as news, weather and incident reports. AERO messages on the other hand are a form of satellite ACARS, and typically contain short messages from aircraft. More interestingly with a bit of work compiling audio decoders, it is also possible to listen in to AERO C-Channel conversations, which is an emergency phone call service available on some aircraft.

In his video Corrosive gives an overview and demonstration of EGC and AERO reception.

Inmarsat LES EGC and AERO ACARS Decoding

New Products in Store: RadarBox ADS-B Bundle Including Outdoor ADS-B Antenna and ADS-B Optimized RTL-SDR Dongle

A while back we posted about flight tracking company RadarBox.com who had launched their 1090 MHz ADS-B optimized RTL-SDR. Like other ADS-B optimized RTL-SDR's, the dongle contains a 1090 MHz filter and a low noise amplifier that reduces the noise figure, resulting in better SNR, and thus more planes spotted at further distances.

We spoke with RadarBox and asked if they could provide a low cost RTL-SDR + Antenna bundle for us. That bundle is now available in our store for $49.95 + shipping. Shipping takes about 2-3 weeks and costs between $10 - $25 depending on your country. Shipping costs will automatically added to the cart on checkout. Please note that due to the larger size this will be shipped in a cylindrical package from a separate Chinese warehouse, and tracking info will come a few days later in a separate email.

The bundle includes:

  • 1x RadarBox ADS-B 1090 MHz SMA Outdoor Antenna with mounting brackets
  • 1x RadarBox ADS-B Optimized 1090 MHz RTL-SDR

The antenna is a has 7 dBi gain, 50 (+-5) Ohm impedance, and is made from fiberglass and aluminum. It is fully waterproof and outdoor rated. This is a great set at a great price to get started tracking planes with ADS-B.

To purchase, please click the Add to Cart button below or visit our store at www.rtl-sdr.com/store. Please note we only have limited stock of this product.

Add to cart
Image may be NSFW.
Clik here to view.
RadarBox Bundle: Includes 1x Outdoor ADS-B Antenna, 1x ADS-B Optimized RTL-SDR


Raspberry Pi 4 Released: Improvements to CPU, Networking, USB, RAM and more

The Raspberry Pi is the most popular credit sized computing board in the world. It is commonly used as a low cost and portable computing platform for SDRs like the RTL-SDR. Today the Raspberry Pi 4 was released, bringing us a new US$35 single board computer with many improvements. Some of the main improvements that make the Pi 4 great for software defined radios are listed below:

CPU: The Pi 4 uses a Quad-Core Broadcom ARM A72 clocked at 1.5 GHz. This chip should be significantly faster compared to the older chip used on the Pi3B+ with performance now being similar to that of the Tinkerboard. This will be especially useful for CPU intensive SDR applications like the direction finding and passive radar software for our coherent 4-tuner RTL-SDR known as the KerberosSDR. It should also help allow OpenWebRX servers to serve more simultaneous users, allow graphical programs like GQRX to run smoother, and allow for higher sample rates on higher end SDRs.

GPU: The new faster GPU should help graphical SDR programs run smoother.

RAM: The Pi 4 comes with three RAM options, either 1GB, 2GB or 4GB of RAM. The versions with more RAM will be great for memory intensive applications such as GNU Radio (and compiling GNU Radio). It will also allow more programs to run in the background, and perhaps combined with the improved CPU speed allow for multiple SDRs to be used on demanding tasks.

Networking: The Pi 4 finally support Gigabit Ethernet which will be very useful to people using the board as an SDR server over the internet.

USB: There are now two USB 3.0 ports available which means that USB 3.0 SDRs like the LimeSDR could in theory be used at higher sample rates on the Pi 4.

There are also many other improvements such as dual 4K HDMI ports, a USB-C power supply port and faster SD card transfers.

Image may be NSFW.
Clik here to view.
Raspberry Pi 4 Improvements

It is not yet known if the very useful Raspberry Pi specific software known as RPiTX will continue to function on the new Pi 4. RPiTX is software that turns Raspberry Pi units into fully functional RF transmitters without the need for any additional transmitting hardware - just attach an antenna wire to a GPIO pin. It works by modulating the GPIO pin in such a way to create almost any type of RF transmission. RPiTX only functions on the specific proprietary Broadcom CPU chips that the Raspberry Pi's use. The Pi 4 does continue to use a Broadcom CPU, so we are hopeful.

The new changes bring the Raspberry Pi up to speed with rivals like the Tinkerboard, but at a lower price and with a much better amount of software and OS support provided. The boards currently cost $35 for the 1GB version, $45 for the 2GB version and $55 for the 4GB version. They are sold via local resellers which can be found on the official Pi 4 product page.

Viewing all 1674 articles
Browse latest View live