Quantcast
Channel: rtl2832 – rtl-sdr.com
Viewing all 1681 articles
Browse latest View live

Decoding Meteor-M Images on a Raspberry Pi with an RTL-SDR

$
0
0

Thanks to Andrey for writing in and showing us his Java based Meteor-M decoder for the RTL-SDR which he uses on a Raspberry Pi. The decoder is based on the meteor-m2-lrpt GNU Radio script and the meteor_decoder which he ported over to Java. Essentially what he's done is port over to Java a bunch of GNU Radio blocks as well as the meteor decoder. The ported Java blocks could also be useful for other projects that want to be cross platform or run without the need for GNU Radio to be installed.

In his blog post (blog post is in Russian, use Google Translate for English) Andrey explains his motivation for writing the software which was that the Windows work flow with SDR# and LRPTofflineDecoder is quite convoluted and cannot be run headless on a Raspberry Pi. He then goes on to explain the decoding algorithm, and some code optimizations that he used in Java to speed up the decoding. Andrey notes that his Java version is almost 2x slower compared to the GNU Radio version, but still fast enough for real time demodulation.

Meteor-M2 is a Russian weather satellite that operates in the 137 MHz weather satellite band. With an RTL-SDR and satellite antenna these images can be received. Running on a Raspberry Pi allows you to set up a permanent weather satellite station that will consistently download images as the satellite passes over.

Decoded Images with Andry's Meteor-M software on Raspberry Pi.
Images received with Andry's Meteor-M software running on a Raspberry Pi.

The post Decoding Meteor-M Images on a Raspberry Pi with an RTL-SDR appeared first on rtl-sdr.com.


New Apple iOS (iPhone/iPad) RTL-SDR rtl_tcp Client App in Beta Testing

$
0
0

Over on our forums poster hotpaw2 has released news about his new RTL-SDR app for iOS (iPhones/iPads). If we're not mistaken, this will be the first app that enables RTL-SDR usage on iOS. However, as iOS devices don't allow RTL-SDRs (or any arbitrary USB device) to connect directly to devices, you still need to use a Raspberry Pi or other network connected computing device as an rtl_tcp server. So the RTL-SDR does not plug directly into the iOS device. Currently he is looking for beta testers to help test a pre-release of the software. Hotpaw2 writes:

Hi. A first version of my iOS SDR app is nearing completion. So I'm interested finding a few users who would like to beta test a pre-release of the app, and provide some feedback. The beta test requirements are having a 64-bit iOS device (iPhone or iPad) running iOS 11.2.x or newer, having Apple's TestFlight app installed, having a Mac, PC, Raspberry Pi (or other Linux box) that already has rtl_tcp installed and ready to run. (And an RTL-SDR obviously.) The rtl_tcp server must be on a fast WiFi network reachable by your iOS device. Note that iOS TestFlight app distributions do have an expiration date.

iOS does not recognize arbitrary USB devices such as an RTL-SDR. This is even true when using Apple's Lightning Camera Connection kit to provide an iPhone with a wired USB port. So an adapter must be used. I use a headless Raspberry Pi 3 running rtl_tcp as the USB adapter to provide raw IQ samples from the RTL-SDR to the iOS app. A Raspberry Pi Zero W would also work. I then connect to the server either over WiFi, or via wired ethernet. 

This iOS SDR app is fairly simple. I've been experimenting with developing low-level DSP code in Swift. So this SDR app was written from scratch in the Swift programming language. Because the app is targeted for the iOS App store, it uses none of the existing SDR C++ code base. 

The app currently demodulates AM, N-FM, and mono W-FM. It also displays a spectrum and rudimentary waterfall, and allows one to swipe-to-tune. There are not a lot of controls, as screen real-estate on an iPhone is quite limited. But I can walk around the house and, from my iPhone, monitor if my RTL-SDR or AirSpy HF+ are picking up any interesting signals.

Contact info for beta testing can be found here: http://www.hotpaw.com/rhn/hotpaw/ 

Source code to librtlsdr and rtl_tcp can be found in many repositories on github, but zero support for finding or installing such, and/or setting up your Raspberry Pi, will be provided by me.

Screenshot of the RTL-SDR iOS app


The post New Apple iOS (iPhone/iPad) RTL-SDR rtl_tcp Client App in Beta Testing appeared first on rtl-sdr.com.

Enumerating Multiple RTL-SDR Dongles Deterministically for rtl_tcp in Linux

$
0
0

Thanks to user 'luma' on our forums for submitting his technique for managing multiple RTL-SDR dongles on a Linux system. The problem is that rtl_tcp tends to enumerate devices depending on the order they are plugged in. This can create problems like not knowing which dongle is connected to which antenna without physically checking. He writes:

I was looking to utilize a couple RTL dongles to monitor two ISM band frequencies commonly used in LoRa without buying an SDR with wide enough bandwidth to cover both ranges. I pretty quickly ran into issues with how SpyServer and rtl_tcp enumerate devices, which appears to be based mostly upon the order in which each device had been plugged in.

With some work, I think I've come upon a flexible and secure solution to handle an arbitrary number of dongles on one system while maintaining deterministic control of each device. This means I can label an individual dongle, connect it to the desired antenna, and then connect to that dongle on the assigned TCP port every time, without regard to the order in which things have been plugged in.

The rest of his post shows the steps which include creating an unprivileged service user, using rtl_eeprom to set device serial numbers and using a script that automatically runs on startup which will enumerate the dongles deterministically each time.

The post Enumerating Multiple RTL-SDR Dongles Deterministically for rtl_tcp in Linux appeared first on rtl-sdr.com.

A Discone Antenna Made from 3D Printed Parts and Aluminum Tape

$
0
0

A Discone is a type of antenna that is designed to be resonant over a wide range of frequencies. Most antenna designs only really receive well on a few resonant frequencies, but a Discone is resonant over a much wider frequency range. This makes it a good partner for RTL-SDR and other SDR units as many SDRs tend to have wide tunable frequency ranges. With a wideband antenna like a Discone connected to an RTL-SDR one can scan over the almost entire tunable frequency range without needing to change antennas for each band. The drawbacks to a Discone however is that the antenna gain is not very high, and that it makes the SDR more susceptible to out of band interference. They also tend to be fairly expensive and difficult to build.

However now over on Thingiverse, mkarliner (aka Mike) has a remedy for the difficulty in building a Discone with his 3D printable Discone design. To construct it you simply need the 3D printed parts, some .3mm and 2mm plastic sheets, a 25mm plastic conduit and some aluminium tape. Mike's design works from 400 MHz and up, but the design could be easily enlarged for better performance on the lower frequencies. He writes:

The Discone antenna is remarkable in that it is capable of receiving and transmitting over a wide range of frequencies with good matching. Because of this, it is a good match for SDR receivers such as the popular RTL-SDR sticks.

The only really tricking thing about making a discone is that the disc has to be balanced at the very top of the cone, which is mechanically awkward.

The two parts here allow the cone to be solidly clamped and provide an adequate base for the disk. There also two holes for bring the coax centre and braid out to the disc and cone.
The base part has a socket at the bottom for 25mm (1 inch) plastic conduit for mounting

This antenna illustrated is designed for 400MHz and up, and as such transmits well on the 70cms amateur band, US and UK PMR channels and 23cms. It also receives aircraft ADS-B signals very well. I used .3mm plastic sheet for the cone and 2mm plastic for the disc, and then covered them with aluminium weatherproof tape. Be sure to check for continuity across the tape stripes.

The screenshot is of a calculator by VE3SQB which can be downloaded from http://www.ve3sqb.com/ if you want to make attenna's for other ranges.

A 3D Printed Discone

If you're interested in building wideband antenna there is also the planar disk antenna (pdf) which can be built out of pizza pans.

The post A Discone Antenna Made from 3D Printed Parts and Aluminum Tape appeared first on rtl-sdr.com.

Welle.io DAB Decoder updated to Version 1.0

$
0
0

Welle.io is a Windows/Linux/MacOS/Android/Raspberry Pi compatible DAB and DAB+ broadcast radio decoder which supports RTL-SDR dongles, as well as the Airspy and any dongle supported by SoapySDR. It is a touch screen friendly piece of software which is excellent for use on tablets, phones and perhaps on vehicle radio touch screens.

DAB stands for Digital Audio Broadcast and is a digital signal that is available in many countries outside of the USA. The signal contains digital broadcast radio stations, and is an alternative/replacement for standard broadcast FM.

Early last year we posted about Welle.io a couple of times, but now the software has reached maturity as version 1.0 has just been released. Author Albrech writes to us:

We fixed a lot of bugs again and added the translation to Hungarian, Norwegian, Italian and French.

Binary packages are available for Windows, Linux and Android (APK and Play store). The macOS support is possible via Homebrew and we now that welle.io runs also on a Rapsberry Pi 2 and newer.

For questions and support please feel free to use the new forum (https://forum.welle.io).

The Welle.io GUI
The Welle.io GUI

The post Welle.io DAB Decoder updated to Version 1.0 appeared first on rtl-sdr.com.

Raspberry Pi 3 B+ Released: Faster CPU, Faster Networking and Power over Ethernet

$
0
0

RTL-SDR dongles and other SDRs are often used on single board computers. These small credit sized computers are powerful enough to run multiple dongles, and run various decoding programs. Currently, the most popular of these small computers is the Raspberry Pi 3.

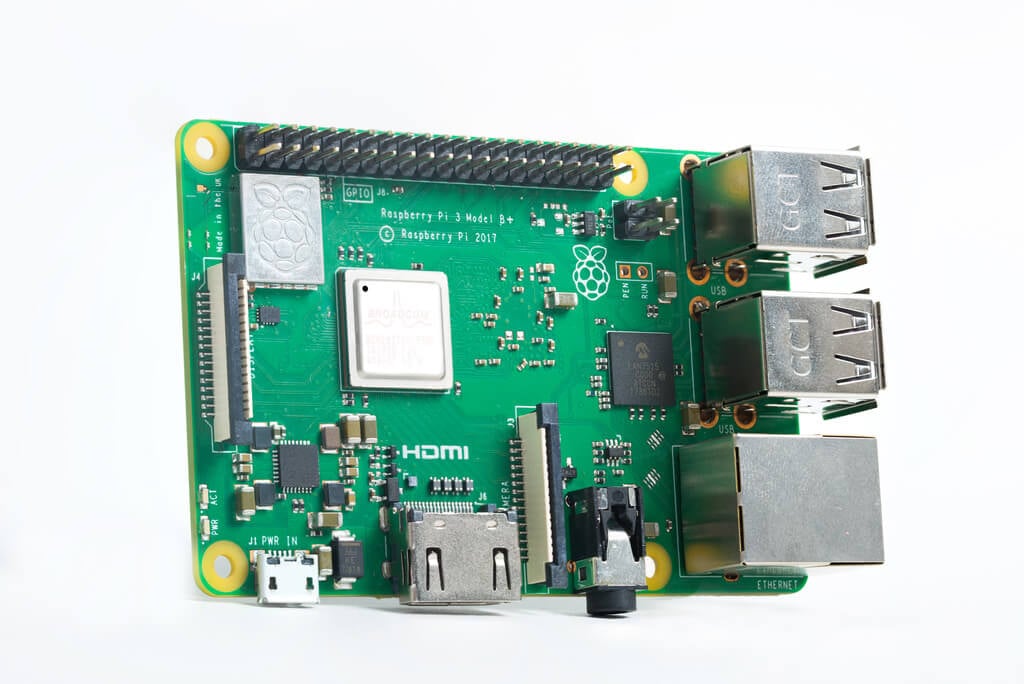
Just recently the Raspberry Pi 3 B+ was released at the usual US$35 price. It is an iterative upgrade over the now older Raspberry Pi 3 B. The 3B+ has an improved thermal design for the CPU, which allows the frequency to be boosted by 200 MHz. WiFi and Ethernet connectivity has also been improved, both sporting up to 3x faster upload and download speeds.

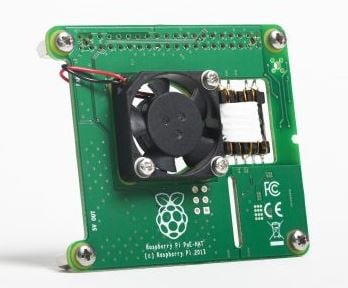
The Raspberry Pi 3 B+ Power over Ethernet Hat

The 3B+ also implements new Ethernet headers which allows for a cleaner Power over Ethernet (PoE) implementation via a hat. Previous PoE hats required that you connect the Ethernet ports together, whereas the new design does not. PoE allows you to power the Raspberry Pi over an Ethernet cable. The official PoE hat is not released yet, but they expect it to be out soon.

The faster processing speed should allow more processing intensive graphical apps like GQRX to run smoother, whilst the improved WiFi connectivity speeds should improve performance with bandwidth hungry applications like running a remote rtl_tcp server. PoE is also a welcome improvement as it allows you to easily power a remote Raspberry Pi + RTL-SDR combination that is placed in a difficult to access area, such as in an attic close to an antenna. Placing the Pi and RTL-SDR near to the antenna eliminates the need for long runs of lossy coax cable. If the Pi runs rtl_tcp, SpyServer or a similar server, then the RTL-SDR can then be accessed by a networked connected PC anywhere in your house, or even remotely over the internet from anywhere in the world. 

The Raspberry Pi 3 B+

The post Raspberry Pi 3 B+ Released: Faster CPU, Faster Networking and Power over Ethernet appeared first on rtl-sdr.com.

Radio For Everyone: Testing the RTL-SDR.com Triple Filtered ADS-B LNA, Amplified Coketenna

$
0
0

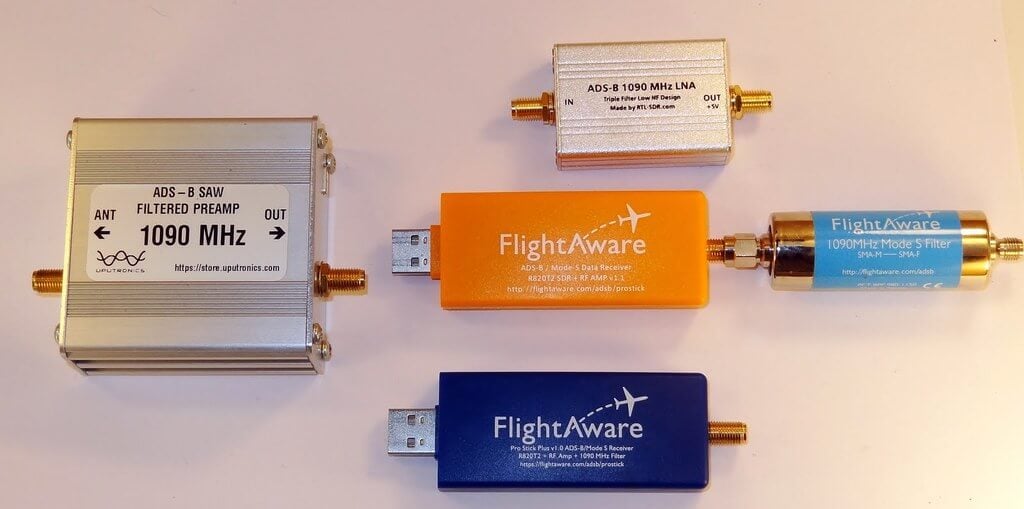
Akos, author of his blog 'Radio for Everyone' has recently reviewed our new RTL-SDR.com Triple Filtered ADS-B LNA. In the review he compares our ADS-B LNA against another external ADS-B LNA by Uputronics and against the FlightAware Prostick and Prostick+. The tests use the external LNA's plugged directly into the dongle in order to more fairly compare against the FlightAware dongles which have LNA's built in to the dongles themselves. From his results the RTL-SDR.com ADS-B LNA appears to have near identical results with the Uputronics LNA, and slightly better results compared to the FlightAware dongles. Akos has not yet tested the main use-case of the LNA, which is to use it at the end of a run of coax cable, however he plans to do this in a future test. Also in his second post Akos shows how to build a simple amplified Coketenna using our ADS-B LNA.

On the subject of ADS-B performance we note that there are two ways to set up a system for optimal reception (apart from the antenna). The first is to place the computing and radio devices (such as a Raspberry Pi and RTL-SDR) as close to the antenna as possible (leaving a ~1m coax run to avoid local interference from the Pi). For this type of setup it is cheaper to use a FlightAware Prostick Plus RTL-SDR dongle since this has an ADS-B LNA built into it. However, the disadvantage is that you may need to set up a Power over Ethernet system, or find a remote power source, and possibly place the Pi in a difficult to service location such as in an attic or up a mast.

The second option is to use an external ADS-B LNA close to the antenna, and run coax down to the computing device which is positioned in a more accessible location. The LNA will negate any losses in the coax cable, and with high enough gain on the LNA, using quality coax is not such a high requirement since those losses are negated by sufficient LNA gain. Both methods will yield similar excellent performance.

Tested ADS-B LNA's and ADS-B RTL-SDR Dongles

The post Radio For Everyone: Testing the RTL-SDR.com Triple Filtered ADS-B LNA, Amplified Coketenna appeared first on rtl-sdr.com.

GridTracker Now Available on Windows, Mac and Ubuntu (Debian)

$
0
0

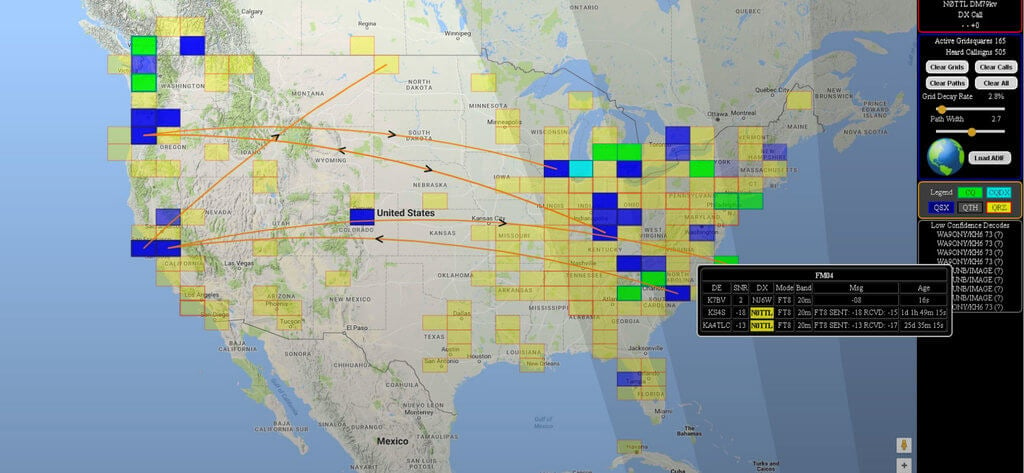
In early February we posted news about the release of a program called GridTracker. GridTracker is a live mapping program for WSJT-X which is a software decoder for low power weak signal ham communications modes such as FT8, JT4, JT9, JT65, QRA64, ISCAT, MSK144 and WSPR. Although these are low power modes, the protocols are designed such that even weak signals can potentially be received from across the world. Mapping the received signals can be interesting as it may give you an idea of current HF propagation conditions.

Previously GridTracker was Windows only software. However recently GridTracker was updated to now include support for Mac and Ubuntu (Debian) operating systems as well. This is great news as it makes it much easier to set up a portable GridTracker screen on a portable computer like a Raspberry Pi.

GridTracker Mapping out Weak Signal Communications.

The post GridTracker Now Available on Windows, Mac and Ubuntu (Debian) appeared first on rtl-sdr.com.


PiAware Radar – A Traditional Radar-Like Display for ADS-B, and Setting up an ADS-B Cockpit Flight Display

$
0
0

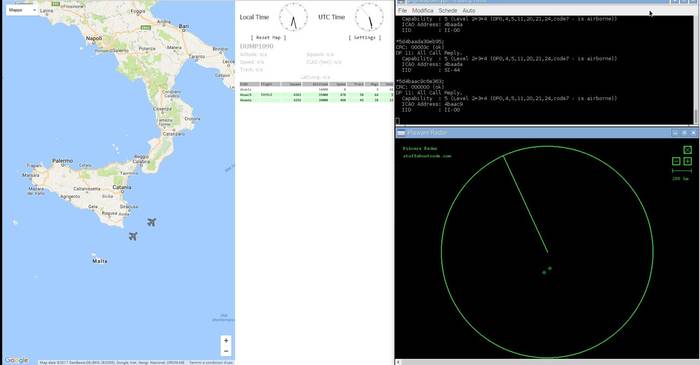
PiAware Radar is a Python script that connects to your PiAware server and uses the received ADS-B data to display a familiar radar-like display (green circle with rotating radius, and aircraft displayed as blips). PiAware is the software used to take ADS-B data from an RTL-SDR dongle running on a Raspberry Pi and feed flightaware.com. A radar-like display is probably not very useful, but it could be used to set up an interesting display that might impress friends. Over on his blog IT9YBG has uploaded a tutorial that shows how to set PiAware Radar up on a Raspberry Pi.

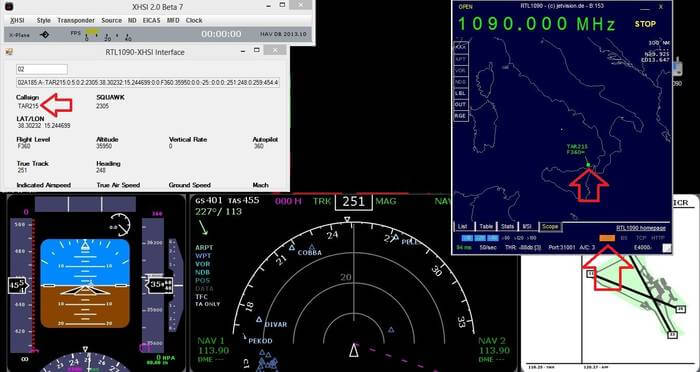
Also on his blog IT9YBG has uploaded another tutorial that shows how to set up 1090XHSI, which is a program that displays an 737 aircraft cockpit simulation using live ADS-B data. The ADS-B data updates the instrument displays in real time, giving you a view of exactly what the pilots might be seeing on their dashboard of their aircraft. We posted about this software in the past, but IT9YBG's tutorial helps make it much easier to set up.

PiAware Radar
PiAware Radar
1090 XHSI 737 Cockpit Simulation from ADS-B Data

The post PiAware Radar – A Traditional Radar-Like Display for ADS-B, and Setting up an ADS-B Cockpit Flight Display appeared first on rtl-sdr.com.

New SDR# Plugin: Toolbar Menu Plugin

$
0
0

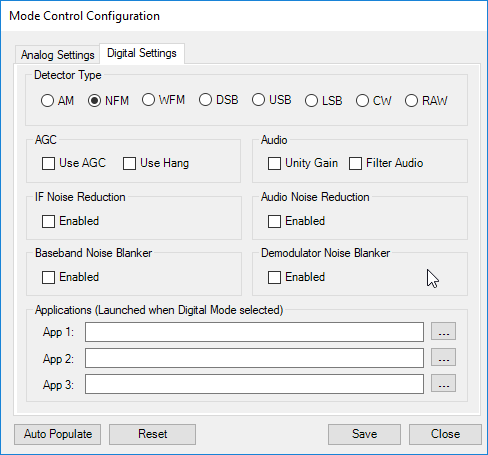
Eddie Mac has just released another useful plugin for SDR# called "Toolbar Plugin". This is an accessibility improvement plugin that simply puts many of the plugin controls on the SDR# toolbar. This eliminates the need to constantly open and close plugin panels on the left.

The plugin includes controls for setting the demodulation mode, changing the FFT display settings, a direct frequency entry text box, frequency stepper buttons, an SNR level meter, squelch controls, analog/digital preset buttons, screen grabber controls, and time slot selectors for the TETRA decoder plugin. The analog/digital preset buttons are quite interesting as they allow you to set presets for either analog or digital signals. For example for a digital signal you could set the preset to use NFM demodulation, and to launch the DSD+ application automatically.

More information about this and Eddie's other plugins can be found on his site, and on this forum post.

Some toolbar plugin selections.
Analog/Digital Preset Settings

The post New SDR# Plugin: Toolbar Menu Plugin appeared first on rtl-sdr.com.

An Intro to RTL-SDR: Technical DSP Concepts Explained

$
0
0

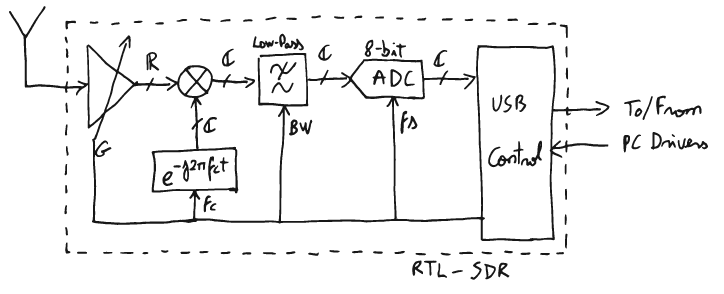
Over on his blog Ajoo has posted a very comprehensive introduction to the technical concepts behind RTL-SDR, as well as any other SDR in existence. His post first goes through the basic communications theory and mathematical concepts required to understand the technical concepts behind software defined radio. He then goes on to specifically discuss the RTL-SDR and how it works internally, mentioning what the major components do and providing useful block diagrams.

In part II of his introduction he moves on to the software. Here he starts to explain a bit about librtlsdr and how the RTL-SDR drivers and codebase is put together. Further on he explains higher level software such as rtl_test, rtl_fm, rtl_sdr, the pyrtlsdr wrapper and how it could be used to demodulate FM.

If you're looking at diving deeper into SDR theory then Ajoo's posts are excellent starting points. Note that the theory explanations come at about an undergraduate University level of complexity, and thus these posts are mostly for people wanting a deeper understanding of SDR. To simply use an RTL-SDR to receive signals such a deep level of understanding is not required.

In a future post which is not yet available, Ajoo will introduce GNU Radio and show how to demodulate FM signals. It appears his goal is to work his way to an understanding of how GPS L1 signals work.

One of Ajoo's block diagrams explaining the RTL-SDR behavioral model.

The post An Intro to RTL-SDR: Technical DSP Concepts Explained appeared first on rtl-sdr.com.

Explaining and Demonstrating Jam and Replay Attacks on Keyless Entry Systems with RTL-SDR, RPiTX and a Yardstick One

$
0
0

Thank you to Christopher for submitting to us an article that he's written for a project of his that demonstrates how vulnerable vehicle keyless entry systems are to jam and replay attacks. In the article he explains what a jam and replay attack is, the different types of keyless entry security protocols, and how an attack can be performed with low cost off the shelf hardware. He explains a jam and replay attack as follows:

The attacker utilises a device with full-duplex RF capabilities (simultaneous transmit and receive) to produce a jamming signal, in order to prevent the car from receiving the valid code from the key fob. This is possible as RKEs are often designed with a receive band that is wider than the bandwidth of the key fob signal (refer Figure 3, right). The device simultaneously intercepts the rolling code by using a tighter receive band, and stores it for later use. When the user presses the key fob again, the device captures the second code, and transmits the first code, so that the user’s required action is performed (lock or unlock) (Kamkar, 2015). This results in the attacker possessing the next valid rolling code, providing them with access to the vehicle. The process can be repeated indefinitely by placing the device in the vicinity of the car. Note that if the user unlocks the car using the mechanical key after the first try, the second code capture is not required, and the first code can be used to unlock the vehicle.

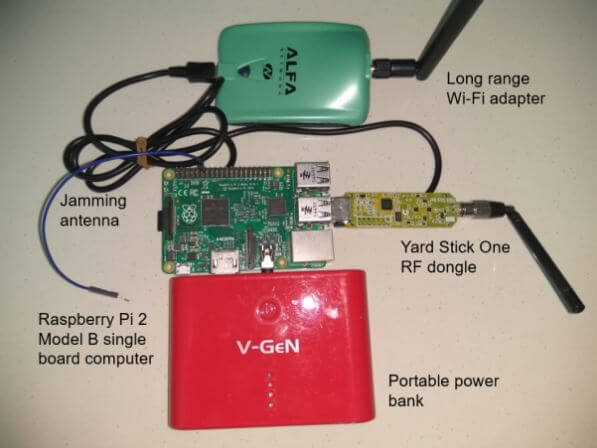
In his demonstrating the attack he uses the RTL-SDR to initially find the frequency that they keyfob operates at and to analyze the signal and determine some of it's properties. He then uses a Raspberry Pi running RPiTX to generate a jamming signal, and the YardStick One to capture and replay the car keyfob signal.

Jam and Replay Hardware: Raspberry Pi running RpiTX for the Jamming and a Yardstick One for Capture and Replay.

The post Explaining and Demonstrating Jam and Replay Attacks on Keyless Entry Systems with RTL-SDR, RPiTX and a Yardstick One appeared first on rtl-sdr.com.

Using a Transmit/Receive Switch to Protect an SDR from a Transmit Radio

$
0
0

A question that comes up often is how to combine an RTL-SDR, or any other RX only SDR with a transmit capable amateur radio. It's not possible to connect the RX only SDR together with the TX radio via a standard splitter because the TX radio's power will most likely blow up the SDR with it's powerful output. To solve this problem you need either a manual switch that will switch out the SDR when transmitting which requires absolute discipline to not accidentally transmit in the wrong switch position, or an automatic relay switch.

Over on YouTube channel HamRadioConcepts has given a good overview and demonstration of the MFJ-1708SDR Transmit/Receive automatic relay switch, which is a good product that solves this issue. It is also a fairly budget friendly option, coming in at only US$79.95 over on the MFJ website. HamRadioConcepts notes that the switch automatically grounds out the SDR whenever the PTT on the radio is pressed, and also has a fail safe that will automatically detect a transmission and ground the SDR if PTT is disconnected.

The post Using a Transmit/Receive Switch to Protect an SDR from a Transmit Radio appeared first on rtl-sdr.com.

Art from Satellite Transmissions: SatNOGS and Software Defined Radio used in a Sound Art Installation

$
0
0
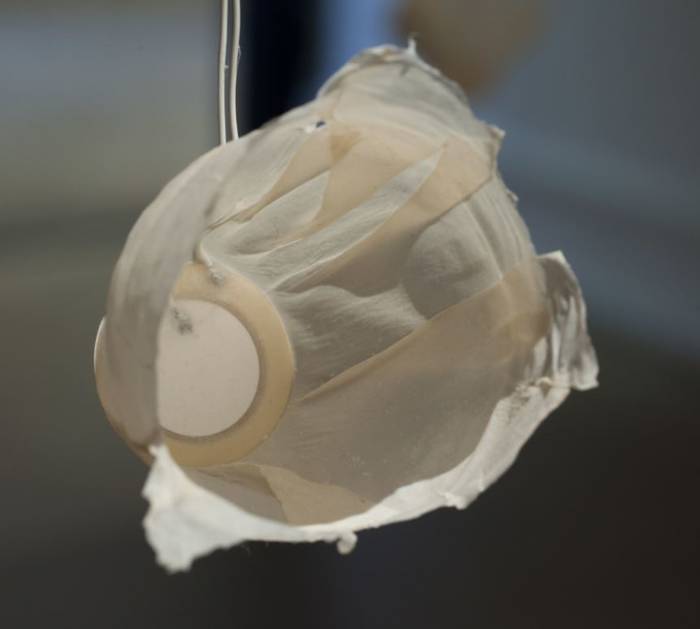
One of the piezo speakers playing the satellite transmissions.

In the past we've seen software defined radio's like the HackRF use to create art installations such as the 'Holypager', which was an art project that aimed to draw attention to the breach of privacy caused by pagers used by doctors and staff at hospitals.

Recently another art installation involving a software defined radio was exhibited at Wichita State University. The project by artist Nicholas A. Knouf is called "they transmitted continuously / but our times rarely aligned / and their signals dissipated in the æther" and it aims to collect the sounds of various satellite transmissions, and play them back using small piezo speakers in the art gallery. To do this he built a SatNOGS receiver and used a software defined radio to capture the audio. He doesn't mention which SDR was used, but most commonly RTL-SDR's are used with the SatNOGS project. Nicholas describes the project below:

This 20-channel sound installation represents the results of collecting hundreds of transmissions from satellites orbiting the earth. Using custom antennas that I built from scratch, I tracked the orbits and frequencies of satellites using specialized software. This software then allows me to collect the radio frequency signals and translate them into sound.

The open source software and hardware, called SatNOGS and developed by a world-wide group of satellite enthusiasts, enables anyone to build a ground station for tracking satellites and their transmissions, which are then uploaded to a publicly accessable database. Data received by my ground stations can be found here. These transmissions are mostly from weather satellites, CubeSats (small satellites launched by universities world-wide for short-term research), or amateur radio repeaters (satellites designed for ham radio operators to experiment with communication over long distances).

I made the speakers hanging from the grid from a piezoelectric element embedded between two sheets of handmade abaca paper that was then air dried over a form.

The project was also discussed over on the SatNOGS forum.

The SatNOGS art installation

The post Art from Satellite Transmissions: SatNOGS and Software Defined Radio used in a Sound Art Installation appeared first on rtl-sdr.com.

Exploring CubicSDR with a Video Tutorial

$
0
0

Over on YouTube Corrosive has uploaded a new video where he explores CubicSDR, and explains all the windows and settings that it has. CubicSDR is a free RTL-SDR compatible cross-platform open source multi-mode SDR application, similar in nature to SDR#, HDSDR SDR-Console etc. It's quite popular due to it's multi-platform nature, meaning that it can run on Windows, MacOS and Linux.

The post Exploring CubicSDR with a Video Tutorial appeared first on rtl-sdr.com.


Using QIRX SDR and DAB Signals to Calibrate RTL-SDR Dongles

$
0
0

Over on his site, Clem the author of the QIRX SDR software package has written up a three part series where he explains an ultra-fast and very accurate method for calibrating the frequency offset of RTL-SDR receivers by using DAB signals. If you are unfamiliar with DAB, it stands for 'Digital Audio Broadcast' and is a type of digital radio station available in multiple countries in the world, especially in Europe. However it is not used in the USA. Clem writes:

I wrote a three-part tutorial about an ultra-fast, generally available (where you have DAB reception) and very accurate method to calibrate RTL-SDR receivers. It is called "Tutorial: Calibrate your RTL-SDR in 15 Seconds", http://softsyst.com/QIRXCalibrate?sequenceNo=0. It is using the frequency of a DAB transmitter as the reference signal, and is coming in three parts:

· Part I: Method and Measurement, describes the method (example) and compares it to two other, well-known methods.

· Part II: Checks, Frequencies, Sampling Rates: Tells how to make plausibility checks on the obtained calibration result, goes into the foundation of different measuring methods, and explains why calibrating a receiver is generally beneficial, not only for DAB purposes (where at least the frequency correction is mandatory).

· Part III: Improving DAB, Tells why it is advantageous for DAB reception not only correcting the frequency, but also the sampling rate (which is often omitted).

Part I and Part II of these are already on our website, Part III will come soon.

QIRX Being used to Calibrate an RTL-SDR dongle on DAB signals

The post Using QIRX SDR and DAB Signals to Calibrate RTL-SDR Dongles appeared first on rtl-sdr.com.

Information on Time Correlating Signals with RTL-SDRs

$
0
0

In a previous post back in September 2017 Stefan Scholl (DC9ST) treated us to a very interesting write up about how to localize transmitters to within a few meters using time difference of arrival (TDOA) techniques with multiple RTL-SDR dongles spread out over an area.

Stefan has recently added to his post now with some additional information on how to properly correlate signals received between multiple RTL-SDR dongles, which is one of the key parts to TDOA. He writes that he covers the following questions:

- What signal parameters influence the quality of the correlation?
- Which type of correlation calculations are available (four)
- Which are suitable with RTL-SDRs, considering noise and phase and frequency offset?

Stefan writes that his findings could be interesting to people interested in the following techniques:

- TDOA localization
- Synchronizing several RTL-SDRs
- Passive Radar

Comparing various bandwidth sizes on correlation quality

The post Information on Time Correlating Signals with RTL-SDRs appeared first on rtl-sdr.com.

Video on using an RTL-SDR + Noise Generator as a Poor Man’s Network Analyzer

$
0
0

Over on YouTube user AE0AI has uploaded a video where he explains how he uses an RTL-SDR and a home made noise source as a poor man's network analyzer. A network analyzer is a tool that allows you to analyze the response of RF devices, such as filters. By using a noise source together with an RTL-SDR the same functionality as a network analyzer can be obtained, however of course with less accuracy.

In the video AE0AI shows us his home made noise generator, which is a based on a simple circuit that he found online. He then shows the noise generator connected to the RTL-SDR, which shows that his home made generator works up to about 40 MHz. Later in the video he tests a home made 40m filter with the noise source and RTL-SDR, and the response is easily visible. With the response visible he is able to tune the filter by adjusting the inductor windings.

We have a tutorial on the same concepts available here.

The post Video on using an RTL-SDR + Noise Generator as a Poor Man’s Network Analyzer appeared first on rtl-sdr.com.

Automatically Receiving, Decoding and Tweeting NOAA Weather Satellite Images with a Raspberry Pi and RTL-SDR

$
0
0

Over on Reddit we've seen an interesting post by "mrthenarwhal" who describes to us his NOAA weather satellite receiving system that automatically uploads decoded images to a Twitter account. The set up consists of a Raspberry Pi with RTL-SDR dongle, a 137 MHz tuned QFH antenna and some scripts.

The software is based on the set up from this excellent tutorial, which creates scripts and a crontab entry that automatically activates whenever a NOAA weather satellite passes overhead. Once running, the script activates the RTL-SDR and APT decoder which creates the weather satellite image. He then uses some of his owns scripts in Twython which automatically posts the images to a Twitter account. His Twython scripts as well as a readme file that shows how to use them can be found in his Google Drive.

mrthenarwhal AKA @BarronWeather's twitter feed with automatically uploaded NOAA weather satellite images.

The post Automatically Receiving, Decoding and Tweeting NOAA Weather Satellite Images with a Raspberry Pi and RTL-SDR appeared first on rtl-sdr.com.
QuestaSDR: New RTL-SDR Software for Android

$
0
0

Last year we posted about QuestaSDR, which is a simple SDR multi-mode GUI that is compatible with the RTL-SDR. Since then QuestaSDR has evolved, and is now available on Android devices as well. It looks to be a nice alternative to RF Analyzer and SDR Touch which are the most popular RTL-SDR Android apps. The description of Android QuestaSDR reads:

QuestaSDR - powerful and flexible, cross-platform Software Defined Radio Application (SDR). Built-in scheduler architecture provides integrate plugins, plugins kits and multi - UI. Typical applications are DXing, Ham Radio, Radio Astronomy and Spectrum analysis.

Support Hardware:
- RTLSDR Dongle

Main features:
- Dark, Ligth, Universal, Material application style
- Many spectrum settings (FFT size, waterfall FPS and color theme)
- AM/SSB/NFM/WFM demodulator
- RDS decoder
- Record AF file
- Frequency bookmarks
- Web remote
- Supported IF-adapter, upconverter, downconverter hardware
- Rig samplerate, frequency, level and iq disbalance calibrate

To start using QuestaSDR, you will need:
- RTL-SDR dongle
- USB OTG Cable - used to connect a RTLSDR to your Android device.

Connect the USB dongle to the USB-OTG, then insert the free end of the cable into the USB port of your Android device and launch the QuestaSDR! Now you can listen to live frequency range shortwave, VHF, UHF.

Feedback and bug reports are always welcome.

Please note that I am not responsible for any legal issues caused by the use of this application. Be responsible and familiarize yourself with local laws before using.

QuestaSDR - New RTL-SDR Compatible Android App

The post QuestaSDR: New RTL-SDR Software for Android appeared first on rtl-sdr.com.
Viewing all 1681 articles
Browse latest View live